|
| |
Tiger By The Tail
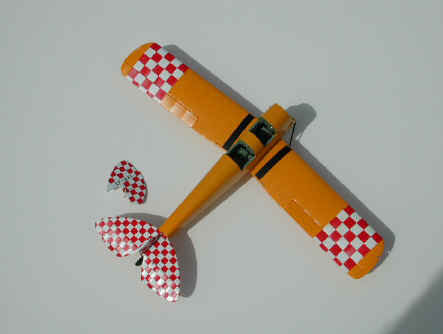
One of my all time favourite aircraft is the DeHavilland DH82C and
although I have built 4 of the 1/32 scale Matchbox kits over the years, I have
never reproduced my old Moth as it was in 1955. I guess the big deterrent was
the checkerboard pattern on the wings and tail, which I had masked off on the
original...to the tune of 14 rolls of masking tape...and I was not about trying
that again in any scale.
The first task was to find decal sheets in the correct size, but this proved
to be futile. The tail surfaces required 3/32 inch and the wings 5/32 inch
checkerboard decals...and no one produced the correct size until a question was
posed on Hyperscale and Mike Grant responded with the answer. An order was
placed and before too long the two sheets, 5X7, arrived in the mail and they
looked really good. Perfect red squares on a clear background…which will be
painted gloss white.
| Now to the old kit that has been sitting in my closet for a great many
years...and the much older factory drawings which I would use for reference. The
major parts were cleaned up and checked for accuracy against the drawings. The
fuselage is of course the British version with planned modifications for the
Canadian built aircraft. The molded in structure and throttles looked out of
place and sure enough the drawings confirmed my worst thoughts. Out came the
trusty Dremel and soon I had all of the interior removed and replaced with
Plasticard stock. The frame structure was replaced as were the throttle, brake
systems, trim system, fuel shutoff and canopy emergency release. |
 |
 |
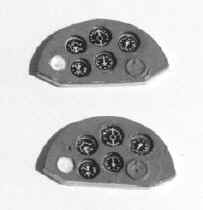 |
I did not like the kit instrument panels and they were the
next to get the treatment, using two layers of plastic card with decal
instrument faces. These were sealed with a couple of drops of Polyscale
clear gloss. |
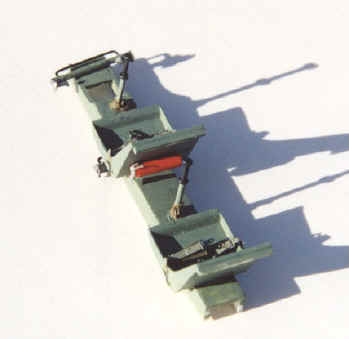 |
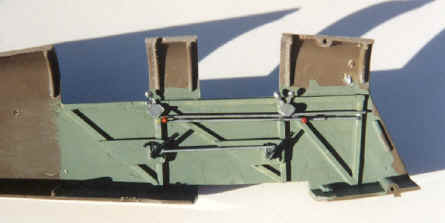
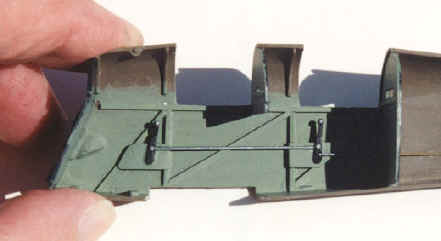
The seats were attached to the control tunnel on the floor
but when I tried to fit things together I found that the seats were too
wide and the tunnel was equally out of proportion. The seats were narrowed
using Mr. Dremel , new sides made from card stock and the new tunnel built
up from .020 card. Rudder pedals were made up from brass bits and plastic
rod and attached to the tunnel. A fire extinguisher was made by turning a
piece of plastic rod in my battery powered drill and trimming with a nail
board sanding stick. Bits of brass were used to finish the bottle which
was installed on the back of the front seat. Eduard photo etch seat belts
were attached to the seats and the whole parcel was installed in the
fuselage. And it fit fairly well. The only kit parts in the fuselage are
the firewall and the rear bulkhead which was properly modified. |
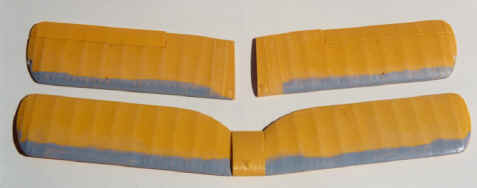
| The tail assembly next got my attention, with the rudder and elevators being
separated from the fixed surfaces, and trim tabs installed. There were no trim
controls on the kit even though they are quite prominent on the real thing. |
 |
 |
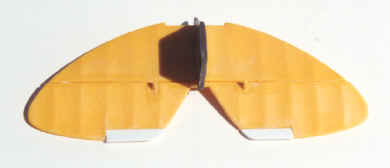
The
wings got the treatment next , with the slats glued in place, filled and
contoured. The Canadian Moth had a plywood leading edge covering over the ribs
and this was taken care of with Tamiya grey putty. The bottom wing needed some
extra attention with hand holds being drilled out and filed smooth. The aileron
external control mechanism was finished using discs punched out of .010"
card and glued in place. The fuel tank received a bit of enhancement using brass
tube and plastic...more on this part later! |
At this point, all rigging points and control cable exits were drilled out
using a no. 72 bit in a pin vice. I plan on using stretched sprue for the
rigging and control cables and by pre-drilling, the job becomes much easier.
| The lower wings are now in place as is the tail assembly and tail wheel. The
plan is to paint the model before installing the upper wing ..and apply the
decals as well. What will it look like ..Well remember this was a civilian Moth,
with my own personalized paint job...before the warbird restoration bug spread
around the globe. My Tiger Myth was an eye-catching airplane and within the next
couple of weeks, I’ll be able to finish this work of love. |
 |
 |
I’m attaching a photo of the real thing, taken at RCAF Station Greenwood,
Nova Scotia in 1954..shortly after being rolled out of the paint shop. I know
that a couple of the guys have already seen this photo but for those that haven’t
, enjoy. Not having a digital camera, I can’t give you work-in-progress photos
but they will follow at a later date
Happy Scratch building...Barney
|
Continued ... Tiger by the Tail 2
|